0. CONTENTS
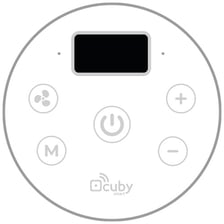
Cuby Aria

Screw and anchor

Disassembly accessory
Power adapter

Adapter - 6 pins
For the installation, you will need the following:
- Drill
- Smarthpone with iOS or Android
- WiFi Connection
- Phillips screwdriver
- Hammer
1. Installation
1.- Turn off the AC Power.

2.- Locate the control wires of the F&C unit and connect them to their corresponding terminal block on the power adapter.

3.- Place the power adapter inside the wall mount box, leaving the 6-pin cable free.

Wall Plate Accessory
The Wall Plate accessory (compatible with the 2020 Nest Thermostat) is not included but can be purchased through Cuby or on Amazon.
1. Pass the 6-pin cable connected to the power adapter through the hole in the metal base of the wall plate and screw it onto the wall mount box.
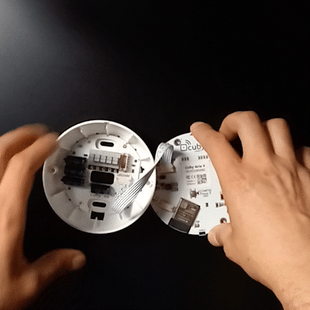
To install the Cuby Aria on the wall, it is necessary to remove the glass panel.
2. Remove the glass panel.

Locate the slot on the edge of the glass as shown in the image.

Insert the disassembly accessory into the slot and gently lever it upward to carefully remove the glass panel.

Be careful when removing the glass panel; avoid letting it fall to the ground.
Be careful when removing the glass panel; avoid letting it fall to the ground.
3.- Pass the 6-pin cable through the hole in the wall plate.

Back of the Glass panel
"Connect the 6-pin cable to the terminal labeled 'POWER'.

Place the glass panel back into the housing.
Insert the edge of the glass panel into the slot at the bottom and press the top of the panel until you hear a click.

Turn the power switch back on.

2. Add your Cuby Aria F&C
- Ensure that your Cuby Aria is properly connected.
- Log in to the Cuby App.

From the list of devices, select Cuby Aria and follow the steps in the app.
The display on your Cuby Aria should show 'CONFIG' on the screen.

If the screen does not show 'CONFIG,' it will be necessary to put the Cuby Aria in configuration mode by following these steps:
- Locate the 'CONFIG' button on the back of the glass panel.

- To put your Cuby Aria in configuration mode, press the button, and you will see the 'CONFIG' message displayed on the screen.

Continue the process by following the steps as usual to add your Cuby Aria F&C.
Wait for the app to find your Cuby Aria. It should not take more than 1 minute.
If the app does not find the Cuby Aria, ensure that Bluetooth and location services are enabled on your phone.
If, after several attempts, the Cuby Aria is still not detected, restart your phone and try again.
Once your phone detects the Cuby Aria, the app will prompt you to name it. Enter a name that identifies where the Aria will be installed.
Do not use the following words in the name, as they may cause issues when using virtual assistants like Alexa and Google Home:
- 'Air'
- 'Air Conditioner'
- 'Climate'
The words 'Air' and 'Air Conditioner' may cause the assistants to interpret the command as requesting the cooling mode or air conditioner mode, which will prevent the command from being executed correctly.
Wait for Cuby Aria to display the available networks. It may take up to 30 seconds for the network list to appear.
Select your WiFi network from the list that appears. Remember, you can also access it manually by entering the name and password.
 Once you select the network you want your Cuby Aria to connect to, enter the password and press 'Next.'
- Wait while your Cuby Aria connects to the WiFi network. This step should not take more than 1 minute.
- Done! You have successfully added your Cuby Aria.
- The next step is to configure the infrared protocol so that the Aria can control the air conditioner.
3. Test
Make sure to press the buttons on the Cuby Aria F&C and check that the A/C responds correctly.
If you have reviewed everything and it still doesn’t work, please contact us.
Procura quitar el control de la pared sólo cuando sea necesario ya que si se hace muy seguido se puede dañar la tapa de plástico.
Conditions of Use
To ensure proper operation and extend the product’s lifespan, the following conditions must be met:
-
Relative Humidity: The product must not be exposed to humidity levels above 90% for prolonged periods, as this may affect its performance and reliability.
-
Heat Exposure: The product should not be placed near heat sources (stoves, radiators, ovens, or other equipment that generates excessive heat).
-
Direct Sunlight: Avoid continuous exposure of the product to solar radiation, as it may alter the operating temperature and damage its internal components.
Failure to comply with these conditions may reduce the device’s lifespan or cause malfunctio